平时我都是通过yum安装nignx,非常方便也很快,坏处就是添加模块需要重新编译,不过也还好,昨天公司测试环境的一台服务器有防火墙的需求,就尝试安装了一遍,下面是安装方法和过程
重新编译Nginx
首先需要先知道你的nginx版本,可以通过nginx -V来查看
[root@elk-test ~]# nginx -V
nginx version: nginx/1.21.4
built by gcc 4.8.5 20150623 (Red Hat 4.8.5-44) (GCC)
built with OpenSSL 1.0.2k-fips  26 Jan 2017
TLS SNI support enabled
configure arguments: --prefix=/etc/nginx --sbin-path=/usr/sbin/nginx --modules-path=/usr/lib64/nginx/modules --conf-path=/etc/nginx/nginx.conf --error-log-path=/var/log/nginx/error.log --http-log-path=/var/log/nginx/access.log --pid-path=/var/run/nginx.pid --lock-path=/var/run/nginx.lock --http-client-body-temp-path=/var/cache/nginx/client_temp --http-proxy-temp-path=/var/cache/nginx/proxy_temp --http-fastcgi-temp-path=/var/cache/nginx/fastcgi_temp --http-uwsgi-temp-path=/var/cache/nginx/uwsgi_temp --http-scgi-temp-path=/var/cache/nginx/scgi_temp --user=nginx --group=nginx --with-compat --with-file-aio --with-threads --with-http_addition_module --with-http_auth_request_module --with-http_dav_module --with-http_flv_module --with-http_gunzip_module --with-http_gzip_static_module --with-http_mp4_module --with-http_random_index_module --with-http_realip_module --with-http_secure_link_module --with-http_slice_module --with-http_ssl_module --with-http_stub_status_module --with-http_sub_module --with-http_v2_module --with-mail --with-mail_ssl_module --with-stream --with-stream_realip_module --with-stream_ssl_module --with-stream_ssl_preread_module --with-cc-opt='-O2 -g -pipe -Wall -Wp,-D_FORTIFY_SOURCE=2 -fexceptions -fstack-protector-strong --param=ssp-buffer-size=4 -grecord-gcc-switches -m64 -mtune=generic -fPIC' --with-ld-opt='-Wl,-z,relro -Wl,-z,now -pie'
可以看到我安装的是1.21.4 ,然后去下载已经安装的nginx相同版本的源码包,可以用wget命令,为了方便安装我把所有这次需要的源码包都放在一个目录里
[root@elk-test ~]# mkdir -p /opt/test
[root@elk-test ~]# cd /opt/test
[root@elk-test test]# wget http://nginx.org/download/nginx-1.21.4.tar.gz

#然后下载 Nginx 开发套件 ngx_devel_kit
wget https://github.com/simpl/ngx_devel_kit/archive/v0.3.0.tar.gz
#下载nginx_lua_module
wget https://github.com/openresty/lua-nginx-module/archive/v0.10.11.tar.gz
#下载luajit
wget http://luajit.org/download/LuaJIT-2.0.5.tar.gz
下载完成后解压所有tar包
ls *.tar.gz | xargs -n 1 tar xf安装luajit
#进入目录
cd LuaJIT-2.0.5/
#编译并安装
make && make install
#将目录写进变量
echo "export LUAJIT_LIB=/usr/local/lib" >> /etc/profile \
echo "export LUAJIT_INC=/usr/local/include/luajit-2.0" >> /etc/profile
#重新加载
source /etc/profile
然后进入nginx源码目录进行重新编译,不过要注意的是之前Nginx所有的模块也需要写在编译命令中,不然会丢失之前的模块,编译的时候,根据第1步nginx -V查到已有的模块,加上本次需新增的模块即可–add-module,注意模块所在位置根据你下载解压的位置填写
进入目录
cd /opt/test/nginx-1.21.4
#执行编译
./configure --prefix=/etc/nginx --sbin-path=/usr/sbin/nginx --modules-path=/usr/lib64/nginx/modules --conf-path=/etc/nginx/nginx.conf --error-log-path=/var/log/nginx/error.log --http-log-path=/var/log/nginx/access.log --pid-path=/var/run/nginx.pid --lock-path=/var/run/nginx.lock --http-client-body-temp-path=/var/cache/nginx/client_temp --http-proxy-temp-path=/var/cache/nginx/proxy_temp --http-fastcgi-temp-path=/var/cache/nginx/fastcgi_temp --http-uwsgi-temp-path=/var/cache/nginx/uwsgi_temp --http-scgi-temp-path=/var/cache/nginx/scgi_temp --user=nginx --group=nginx --with-compat --with-file-aio --with-threads --with-http_addition_module --with-http_auth_request_module --with-http_dav_module --with-http_flv_module --with-http_gunzip_module --with-http_gzip_static_module --with-http_mp4_module --with-http_random_index_module --with-http_realip_module --with-http_secure_link_module --with-http_slice_module --with-http_ssl_module --with-http_stub_status_module --with-http_sub_module --with-http_v2_module --with-mail --with-mail_ssl_module --with-stream --with-stream_realip_module --with-stream_ssl_module --with-stream_ssl_preread_module --with-cc-opt='-O2 -g -pipe -Wall -Wp,-D_FORTIFY_SOURCE=2 -fexceptions -fstack-protector-strong --param=ssp-buffer-size=4 -grecord-gcc-switches -m64 -mtune=generic -fPIC' --with-ld-opt='-Wl,-z,relro -Wl,-z,now -pie' --add-module=/opt/test/ngx_devel_kit-0.3.0 --add-module=/opt/test/lua-nginx-module-0.10.11 --with-ld-opt=-Wl,-rpath,$LUAJIT_LIB
编译过程中可能会报错缺少依赖,根据报错依次添加相应依赖即可:
  1-1),错误:./configure: error: the invalid value in --with-ld-opt="-Wl,-rpath,/usr/local/lib",解决:yum -y install redhat-rpm-config.noarch

  1-2),错误:./configure: error: the HTTP rewrite module requires the PCRE library,解决: yum -y install pcre pcre-devel

  1-3),错误:./configure: error: SSL modules require the OpenSSL library,解决:yum -y install openssl openssl-devel

  1-4),错误:./configure: error: the HTTP XSLT module requires the libxml2/libxslt,解决:yum -y install libxml2 libxml2-dev libxslt-devel

  1-5),错误:./configure: error: the HTTP image filter module requires the GD library,解决:yum -y install gd-devel

  1-6),错误:./configure: error: perl module ExtUtils::Embed is required,解决:yum -y install perl-devel perl-ExtUtils-Embed

  1-7),错误:./configure: error: the GeoIP module requires the GeoIP library,解决:yum -y install GeoIP GeoIP-devel GeoIP-data

1-8),错误:./configure: error: the Google perftools module requires the Google perftools,解决:yum install gperftools-devel编译完成后执行make,但是不要进行make install,编译完成后回再当前Nginx目录下objs文件下出现nginx可执行文件,替换Nginx可执行文件即可
#备份原文件
mv /usr/sbin/nginx /usr/sbin/nginx.bak
#复制新文件
cp objs/nginx /usr/sbin/
#测试一下
nginx -t
如果输出正常的话,到这里为止nginx的waf防护功能就已经开启了,接下来我们去下载waf文件
部署Waf
进到nginx的配置目录(可能与我的不同,根据实际情况而定)
#进入目录
cd /etc/nginx
#下载waf (如果无法访问github,就通过其他途径下载扔进去)
wget https://github.com/loveshell/ngx_lua_waf/archive/master.zip
#解压
unzip master.zip -d /etc/nginx
#重命名(默认的名字太长,也可以不改)
mv /etc/nginx/ngx_lua_waf-master /etc/nginx/waf
然后我们来编辑waf配置文件,通过vim /etc/nginx/waf/config.lua ,下面是文件相关解释
  --规则存放目录
  RulePath = "/etc/nginx/waf/wafconf/"
  --是否开启攻击信息记录,需要配置logdir
  attacklog = "on"
  --log存储目录,该目录需要用户自己新建,切需要nginx用户的可写权限
  logdir = "/etc/nginx/logs/waflog"
  --是否拦截url访问(如果你用了phpmyadmin,开启此项会有问题)
  UrlDeny="on"
  --是否拦截后重定向
  Redirect="on"
  --是否拦截cookie攻击
  CookieMatch="on"
  --是否拦截post攻击(可能会导致上传功能异常)
  postMatch="on"
  --是否开启URL白名单
  whiteModule="on"
  --填写不允许上传文件后缀类型
  black_fileExt={"php"}
  --ip白名单,多个ip用逗号分隔
  ipWhitelist={"127.0.0.1"}
  --ip黑名单,多个ip用逗号分隔
  ipBlocklist={}
  --是否开启拦截cc攻击
  CCDeny="on"
  --设置cc攻击频率,单位为秒.默认1分钟同一个IP只能请求同一个地址100次
  CCrate="100/60"
  --警告内内容,可在中括号内自定义 备注:不要乱动双引号,区分大小写
  html=[[
手动创建日志目录
#创建目录
mkdir -p /etc/nginx/logs/waflog
#授权
chmod 755 -R /etc/nginx/logs/waflog
chown nginx.root -R /etc/nginx/logs/waflog
接着我们在nginx.conf文件中http模块中添加配置
lua_package_path "/etc/nginx/waf/?.lua";
lua_shared_dict limit 10m;
init_by_lua_file /etc/nginx/waf/init.lua;
access_by_lua_file /etc/nginx/waf/waf.lua;
添加完成以后我们重启nginx(一定要重启,不能reload,因为可执行文件已经变了,重载还是原来的可执行文件)
systemctl restart nginx测试功能
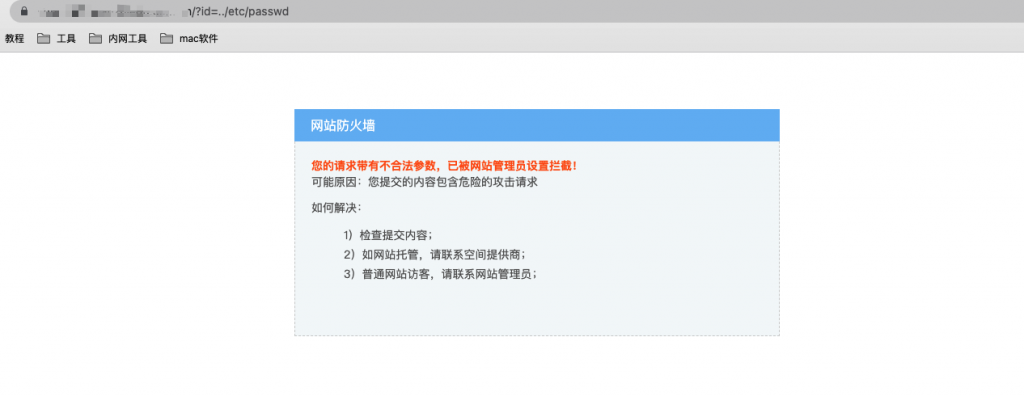
我们在浏览器中输入你的IP:端口,后面加上/?id=../etc/passwd ,如果出现防火墙代表以及成功